Here is my presentation of some ideas on how to flip inside and outside the classroom plus some useful tools, mostly free, for teachers and students.
Narralakes

Thursday, 17 November 2016
iPads in the iClass, flipped learning with tablets
Sunday, 18 September 2016
Instant, real-time feedback, with Classkick
Classkick is a great app that has many practical and useful features for the classroom. The main things, for me, that Classkick offers, is the way you can watch, on your iPad, your students working on their iPads in real time. This real time feature gives teachers the ability to make sure students are on task, address student questions and best of all give them instant, real time feedback. As as we know, feedback rates highly in student progression. Formative assessment is also important, so well-planned, worthwhile Classkick activities can also help teachers gather data to assist in mapping out and analysing how the students are progressing.
There are many excellent videos and instructions on how to setup and use Classkick, on the Classkick homepage. This post is a brief intro on some of Classkick's features, not a detailed intro on "how to set up" Classkick. I do mention a few setup things, but I suggest you can go to their site for more detailed instruction if needed. The short video embedded below is one that illustrates a few ways on how I use it in my classes.
Gold Star Items with Classkick
1. Instant Feedback
Real Time Screen View: Classkick is one of the few apps out there where teachers can view, on their iPad or computer, what is on their students iPad screen in real time without peering over the student's shoulders. Apart from helping students with questions and correcting activities, teachers can also see if students are on task.
Digital Hand: This is a very useful function for teachers and students as it allows students to ask for help as soon as they need it. Students merely press the orange hand to ask the teacher for help or the green hand to ask the teacher to check. Once the teacher is on the student's page, a message "teacher is helping" appears, so the student knows they are getting assistance right away.
2. Easy to use: The Classkick canvas is easy to use. The teacher's page is the same as what the students' page with some basic, but useful tools, see the image below.

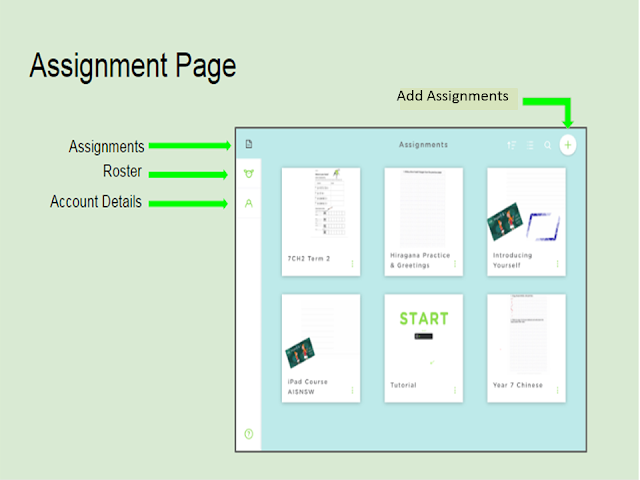
Assignment Page
The Assignment Page is where the class organisation and assignments (activity pages) are organised.
Assignments: Your activities are organised here, as in the image below.
Roster: Your classes are set up and organised here.
Account Details: This is where your details are kept.

There's lots more
There is a lot of helpful and practical information, instruction and how to's on the Classkick site. Please check out their site for more information.
Classkick is definitely worth checking out and trialling in your class.
See how I use Classkick in this video.
Sunday, 26 June 2016
Screencasting on a budget

When screencasting, its always good to plan what you are going to present, just like you would for any lesson preparation. I like to do some mindmapping, brainstorming, or sketchnoting. This I suppose is a type of story boarding and for screencasting, when starting out at least, planning your content could be a valuable step when making your videos. Videos can be a powerful tool and resource that can assist teachers present content to students online. Screencasting is another way you can also flip your lessons.
There are some really good apps and software out there for teachers and students to use. In this post, I will be mainly introducing free or inexpensive software and talk more about apps for tablets in the future.
Flipped learning also comes in various forms, but seeing this post is on screencasting, the ideas here will be using videos that you can create yourself. Check out my earlier post on videos, teaching ideas and handy tools here.
One of the easiest free downloads that you can use is Screencast-o-matic. You can start recording your screen from the website or download their software. Some other similar programs that are free are;
Find out about screencasting
I found the best way to find out on how to prepare and record video lessons was to talk to others who have been doing it for ages, or even not that long, join PLNs and read up as much as possible. This researching I suppose is something I do for just about everything for teaching anyhow and I am sure many of you do as well.
There is a fair bit of debate whether teachers should screencast and make a video with themselves in the video. I think its up to the individual, but I have made videos with and without me on screen and the students always comment that they would rather see me as well, not just hear my voice.
Screencast-o-matic is a favourite of mine. Its easy to use and you are limited to 15 minutes of recording time with the free version. This is a good thing as most videos are best kept between 2 - 5 minutes, maybe 10 minutes max.
Things to think about when you are planning to and in the process of screencasting
- Presentation Format: After you have your idea of what you want to present, decide on a format, either PowerPoint, Google Slides or filming yourself with a whiteboard or butchers paper.
- Practice: Whichever way you want to go, practise a few times first, then record.
- Be Prepared: When ready to record, have everything in place and maybe even a script.
- Mistakes: I doubt anyone get's through a recording without making a mistake, even a 2 minute recording. When you are into your screencast (recording), if you make a mistake, just correct the mistake on the spot like you would in the class, even acknowledge the mistake and keep going. If you cannot live with the mistake in the video, redo that segment and edit the mistake out later.
- Editing: If you are using Screencast-o-matic and want to include text, captions, hotspots, links and perhaps other interactive functions, then you will need to edit all that in later with other software. If you have to cut the mistake out and cut and splice bits and pieces, then you can use something like Movie Maker. Paid video editors cost money and you can do a lot more with them, but for the basic screencast, Screencast-o-matic and Windows Movie Maker are probably good enough.
Editing Tools
- iPad: Cute Cut (Free)
- Windows Movie Maker. Read @lizabrown6 article introducing a few good editing tools. http://tinyw.in/X42k
Suggested PLNs to join to connect with other teachers about screencasting
#Ausflipchat
#aussieEd
#digitalEdchat
http://www.classroom20.com/
http://flippedclassroom.org/
@flippedlearning
and #
#Ausflipchat
More readings on screencasting
http://blogs.techsmith.com/tips-how-tos/what-is-screencasting/
Tech For Teachers http://tinyw.in/rOk3
http://www.schrockguide.net/screencasting.html
http://www.edutopia.org/blog/redefining-learning-through-screencasting-beth-holland
http://edtechteacher.org/apps/screencast/#ipad
I hope you found this post on screencasting useful. Be interested on your thoughts or any feedback! If you'd like to see some videos on tech and Chinese language stuff, please check out my Youtube channels below. Thanks.
An intro to how to screencast with Screencast-O-Matic
Back Channeling
One of the many benefits of PLNs and connecting with others are the transfer and sharing of some great ideas and technologies that can benefit your classes. Thanks to @JoelSperanza for sharing this one.
Back channeling is nothing new, and I think most of us are doing it in some form or another. Google Slides and the questioning tool illustrates how leveraging tech gives teachers another option to help improve student learning. Back channeling is a great tool when you are presenting and would like to encourage student participation, perhaps in the form of comment or questions.
You can watch my intro video or the brief explanation below to check out how to use it.
You don't need to use back channeling all the time, vary your comment and questioning methods like everything else.
Follow these steps to activate the questioning function.

Here's my video on how you can set up a back channel lesson.
http://backchannelchat.com/What-Is-A-BackChannel
http://www.edutopia.org/blog/backchannel-student-voice-blended-classroom-beth-holland
Interested in how back channeling works? Be interested in any feedback, thanks!
Back channeling is nothing new, and I think most of us are doing it in some form or another. Google Slides and the questioning tool illustrates how leveraging tech gives teachers another option to help improve student learning. Back channeling is a great tool when you are presenting and would like to encourage student participation, perhaps in the form of comment or questions.
You can watch my intro video or the brief explanation below to check out how to use it.
Ideas on how to use back channeling in the classroom
Here are a few examples of how I use back channeling in my Chinese language classroom, but you could use it for any subject or presentation.
- Presenting new language and sentence patterns I have the back channel function activated to capture any comments and answer students questions.
- The presenter can ask questions to the class during the presentation and show questions or comments made by other students and have everyone discuss together.
- Apart from in class activities, this would be really useful for online forums as well.
You don't need to use back channeling all the time, vary your comment and questioning methods like everything else.
Follow these steps to activate the questioning function.
- Open up your Google Slide presentation.
- Go to the Present button.
- Press the drop down arrow and go to Presenter view.
- Press Start New in the Teacher's screen.
- Ask students to type the url into the web address bar.
- Start presentation.


Here's my video on how you can set up a back channel lesson.
Want to find out more on back channeling?
Here are some helpful links;http://backchannelchat.com/What-Is-A-BackChannel
http://www.edutopia.org/blog/backchannel-student-voice-blended-classroom-beth-holland
Interested in how back channeling works? Be interested in any feedback, thanks!
Subscribe to:
Posts (Atom)